Macro FCInfoGlass/de
|
|
| Beschreibung |
|---|
| Gibt eine Reihe von Informationen zur Formularanzeige in der 3D-Ansicht. Versionsmakro : 00.05 Datum der letzten Änderung : 2016-08-28 Herunterladen : Werkzeugleisten-Symbol Autor: Mario52 |
| Autor |
| Mario52 |
| Herunterladen |
| Werkzeugleisten-Symbol |
| Links |
| Makros Rezepte Wie man Makros installiert Symbolleisten anpassen |
| Macro-Version |
| 00.05 |
| Datum der letzten Änderung |
| 2016-08-28 |
| FreeCAD-Version(s) |
| None |
| Standardverknüpfung |
| None |
| Siehe auch |
| Arch Inspizieren |
Beschreibung
Gibt eine Reihe von Informationen über die ausgewählte Form und kann diese direkt in der 3D-Ansicht anzeigen.
Temporary code for external macro link. Do not use this code. This code is used exclusively by Addon Manager. Link for optional manual installation: Macro
# This code is copied instead of the original macro code
# to guide the user to the online download page.
# Use it if the code of the macro is larger than 64 KB and cannot be included in the wiki
# or if the RAW code URL is somewhere else in the wiki.

from PySide import QtGui, QtCore

diag = QtGui.QMessageBox(QtGui.QMessageBox.Information,
    "Information",
    "This macro must be downloaded from this link\n"
    "\n"
    "https://gist.githubusercontent.com/mario52a/553b1fc7a8ca5bfa44c6/raw/fc57ec0869a8f68ce396acbaed5e87f396426186/Macro_FCInfoGlass.FCMacro" + "\n"
    "\n"
    "Quit this window to access the download page")

diag.setWindowFlags(QtCore.Qt.WindowStaysOnTopHint)
diag.setWindowModality(QtCore.Qt.ApplicationModal)
diag.exec_()

import webbrowser
webbrowser.open("https://gist.githubusercontent.com/mario52a/553b1fc7a8ca5bfa44c6/raw/fc57ec0869a8f68ce396acbaed5e87f396426186/Macro_FCInfoGlass.FCMacro")

FC Gläserne Information
Verwendung
Ein Objekt auswählen oder die Anwendung starten und ein Objekt auswählen. Daraufhin werden eine Reihe von Informationen in der 3D-Ansicht angezeigt.
Diese Zeile bearbeiten um die Datenanzeige auf dem Bildschirm zu bewegen (Linien 84, 85)
global posiX                 ; posiX                           = 900  # position window coordinate X                   "defaut  = 900"
global posiY                 ; posiY                           = 190  # position window coordinate Y                   "defaut  = 190"
- 900, 190 = Position X, Y obere linke Ecke
Diese Zeile bearbeiten, um die Farbe zu ändern (Linie 92)
#######################################################################
# Section color                                                       #
global colorize              ; colorize                      ="black" # colorize the text choice                       "defaut  = "black"
                                                                      # "black" "white" "red" "green" "blue" "yellow" "magenta" "cyan"
Beispiele
Verfügbar : "Schwarz" "Weiß" "Rot" "Grün" "Blau" "Gelb" "Magenta" "Cyan"
-
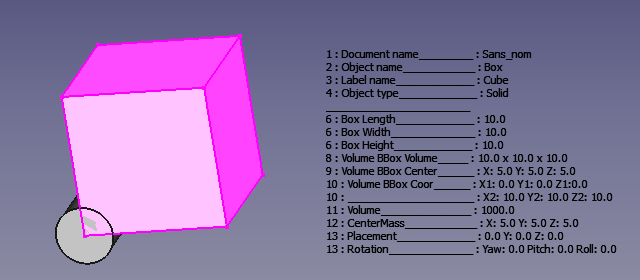 Einfärben ="Schwarz"
 -
 Einfärben ="Weiß"


-
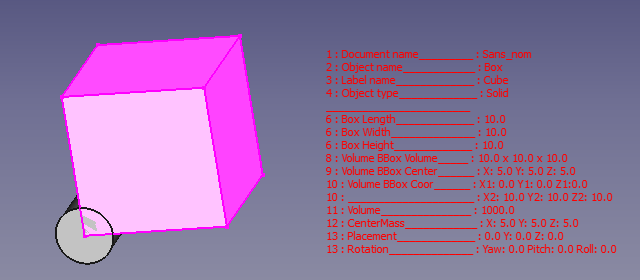 Einfärben ="Rot"
 -
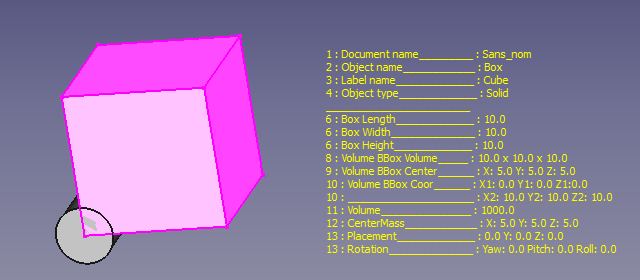 Einfärben ="Gelb"


Dieser Abschnitt Hase-Schalter gibt den Wert 1 für die Anzeige der Informationen oder 0 für die Nichtanzeige der Informationen.
Beispiel:
wird angezeigt ( = 1 )
global LabelObject ;LabelObject = 1 # Label #3 Label Object
wird nicht angezeigt ( = 0 )
global LabelObject ;LabelObject = 0 # Label #3 Label Object
Die Abschnittslinien 79 bis 171
#######################################################################
global visualiserWindow      ; visualiserWindow                = 0    # si visualiserWindow = 1 la fenetre est visible (pour test)  "defaut  = 0"
                                                                      # if visualiserWindow = 1 the windows is visible (for test)   "default = 0"
###Section Configuration ##############################################
# Placement window hidden                                             #
global posiX                 ; posiX                           = 900  # position window coordinate X                   "defaut  = 900"
global posiY                 ; posiY                           = 190  # position window coordinate Y                   "defaut  = 190"
#######################################################################
global SizeX                 ; SizeX                           = 600  # size window length  (do not modify)            "defaut  = 600"
global SizeY                 ; SizeY                           = 600  # size window heigth  (do not modify)            "defaut  = 600"


#######################################################################
# Section color                                                       #
global colorize              ; colorize                      ="black" # colorize the text choice                       "defaut  = "black"
                                                                      # "black" "white" "red" "green" "blue" "yellow" "magenta" "cyan"


#######################################################################
# Section inter                                                       #
global mode                  ; mode                            = 1    # mode 1=degrees mode 0=radians                  "defaut  = 1"
global arondi                ; arondi                          = 4    # many numbers after the decimal point           "defaut  = 4"
global chaineRemplacement    ; chaineRemplacement              = "_"  # replacement string (1 character)               "defaut  = "_"


#######################################################################
# section switch
# if switch = 1 then actif (True Displayed) else inactif (False not Displayed)
global PrintReportView       ;PrintReportView                  = 1    # Affichage dans la vue rapport                  #0  Displayed ReportView
##
global DocumentName          ;DocumentName                     = 1    # Nom du document                                #1  Document Name
global InternalName          ;InternalName                     = 1    # Nom interne de l'objet                         #2  Internal Name
global LabelObject           ;LabelObject                      = 1    # Label                                          #3  Label Object
global ElementName           ;ElementName                      = 1    # Nom de l'element                               #4  Element Name
global ObjectType            ;ObjectType                       = 1    # Type d'objet                                   #5  Object Type
global LineSeparateTitle     ;LineSeparateTitle                = 1    # ligne de separation des titres ____________    #6  Line Separate of Title

## Object subObject
global ObjectLength          ;ObjectLength                     = 1    # longueur Objet ou perimetre si c est une face  #7  Object Length or perimetre if are a face
global ObjectCurveRadius     ;ObjectCurveRadius                = 1    # rayon du subObject si arc ou cerle             #8  radius subObject if arc or cirle
global ObjectCurveCenter     ;ObjectCurveCenter                = 1    # coordonnees centrale subObject si arc ou cerle #9  coordinates center subObject if arc or cirle

## Draft
global LineDimension         ;LineDimension                    = 1    # Dimensions Line                                #10  Line Dimension
global DWireDimension        ;DWireDimension                   = 1    # Dimensions DWire                               #11  DWire Dimension
global CircleDimension       ;CircleDimension                  = 1    # Dimensions Circle                              #12 Circle Dimension
global CirclePartDimension   ;CirclePartDimension              = 1    # Dimensions Circle Part                         #13 Circle Part Dimension

global ArcDimension          ;ArcDimension                     = 1    # Dimensions Arc                                 #14 Arc Dimension
global EllipseDimension      ;EllipseDimension                 = 1    # Dimensions Ellipse                             #15 Ellipse Dimension
global EllipsePartDimension  ;EllipsePartDimension             = 1    # Dimensions Ellipse Part                        #16 Ellipse Part Dimension
global PolygonDimension      ;PolygonDimension                 = 1    # Dimensions Polygon                             #17 Polygon Dimension
global RectangleDimension    ;RectangleDimension               = 1    # Dimensions Rectangle                           #18 Rectangle Dimension
global BSplineDimension      ;BSplineDimension                 = 1    # Dimensions BSpline                             #19 BSpline Dimension
global PointDimension        ;PointDimension                   = 1    # Dimensions Point                               #20 Point Dimension
global BezCurveDimension     ;BezCurveDimension                = 1    # Dimensions BezCurve                            #21 BezCurve Dimension

## Solid
global CylinderDimension     ;CylinderDimension                = 1    # Dimensions du Cylindre Rayon Hauteur Angle     #22 Cylinder Dimension
global BoxDimension          ;BoxDimension                     = 1    # Dimensions du Box Length Width Height          #23 Box Dimension
global SphereDimension       ;SphereDimension                  = 1    # Dimensions de la Sphere                        #24 Sphere Dimension
global EllipsoidDimension    ;EllipsoidDimension               = 1    # Dimensions Ellipsoid                           #25 Ellipsoid Dimension
global ConeDimension         ;ConeDimension                    = 1    # Dimensions du Cone                             #26 Cone Dimension
global TorusDimension        ;TorusDimension                   = 1    # Dimensions du Tore                             #27 Torus Dimension

## Part
global PlanePartDimension    ;PlanePartDimension               = 1    # Dimensions Plan Part                           #28 Plane Part Dimension
global PrismPartDimension    ;PrismPartDimension               = 1    # Dimensions Prisme Part                         #29 Prism Part Dimension
global WedgePartDimension    ;WedgePartDimension               = 1    # Dimensions Wedge Part                          #30 Wedge Part Dimension
global HelixPartDimension    ;HelixPartDimension               = 1    # Dimensions Helix Part                          #31 Helix Part Dimension
global SpiralPartDimension   ;SpiralPartDimension              = 1    # Dimensions Spirale Part                        #32 Spiral Part Dimension
global VertexPartDimensio    ;VertexPartDimension              = 1    # Dimensions Vertex Part                         #33 Vertex Part Dimension
global LinePartDimension     ;LinePartDimension                = 1    # Dimensions Line Part                           #34 Line Part Dimension
global RegularPolygonPartDimension;RegularPolygonPartDimension = 1    # Dimensions RegularPolygon Part                 #35 Regular Polygon Part Dimension

## Face
global FaceSurface           ;FaceSurface                      = 1    # Surface de la face                             #36 Face Surface
global NormalAt              ;NormalAt                         = 1    # Donne la normale (inclinaison)                 #37 normalAt(0,0) Face and edges normalAt(0)
global FaceCenter            ;FaceCenter                       = 1    # Center Face (mass)                             #38 Face Center
global BoundBoxFaceVol       ;BoundBoxFaceVol                  = 1    # BoundBoxFace Volume                            #39 BoundBox Face Volume
global BoundBoxFaceCent      ;BoundBoxFaceCent                 = 1    # BoundBoxFaceCenter                             #40 BoundBox Face Center
global BoundBoxFaceCoor      ;BoundBoxFaceCoor                 = 1    # BoundBoxFace coordinates                       #41 BoundBox Face Coordinates

## Volume
global BounBoxVolumeVol      ;BounBoxVolumeVol                 = 1    # rectangle du BoundBox                          #42 BounBox Volume Volume
global BounBoxVolumeCent     ;BounBoxVolumeCent                = 1    # centre de la forme                             #43 BounBox Volume Center
global BounBoxVolumeCoor     ;BounBoxVolumeCoor                = 1    # boundinbox (dimensions hors tout)              #44 BounBox Volume Coordinates
global VolumeObject          ;VolumeObject                     = 1    # volume                                         #45 Volume Object
global CenterMass            ;CenterMass                       = 1    # centre de la masse                             #46 Center Mass object
global PlacementForme        ;PlacementForme                   = 1    # placement de la forme                          #47 Placement Forme
global LineInclination       ;LineInclination                  = 1    # search inclination XY YZ ZX uniquement lignes  #48 Line Inclination
global VertexesObject        ;VertexesObject                   = 1    # Vertexes de l'objet selectionne                #49 Vertexes Object
global VertexesForme         ;VertexesForme                    = 0    # Vertexes complet de la forme                   #50 Vertexes Forme
                                                                      # peut prendre du temps, depasser la fenetre et donner des donnees incompletes
                                                                      # can take time and exceed the window and give data's incompletes
### End Section Switch #######################################################################################################################
Das Makro nach der Änderung speichern und ausführen
Es ist derzeit nicht möglich, die Funktion aus dem Makro oder dem Bildlauf zu verlassen
Ein Mausklick auf das Objekt zeigt die Informationen zum Objekt an, zwei Mausklicks wählen das Objekt vollständig aus und zeigen alle Informationen an.
P.S.: Es ist auch möglich, dass es in der Linux-Umgebung nicht möglich ist, auf das Objekt innerhalb des Fensters, in dem die Informationen angezeigt werden, zu klicken oder darauf zuzugreifen.
In der Windows-Umgebung gibt es keine Probleme. Innerhalb des Fensters klicken und auf das Objekt zugreifen, mit Ausnahme der angezeigten Zeichen.
Dieses Fenster zum Anzeigen und Ändern der Abmessungen, ändern:
visualiserWindow Linie 81 = 1
Die Zeilen 87 und 88 und SizeX SizeY für Fensterabmessungen
Skript
Das Symbol Macro_FCInfoGlass.FCMacro 
Das Skript auf Gits kopieren. Macro_FCInfoGlass.FCMacro
und die Datei Macro_FCInfoGlass.FCMacro und das Symbol in das Makroverzeichnis kopieren.
Verweise
Diskussion im FreeCAD-Forum: FCInfo Macro
Meine Makros auf gist mario52a
Version
28/08/2016 Ver 00.05 : Radius mit Unterobjekten und Mittelpunktskoordinaten hinzufügen
25/11/2015 Ver 0.04 : Radius mit subObjects und normalAT(0,0) hinzufügen
31/08/2015 Ver 0.03 : Viele Informationen hinzufügen
04/08/2015 Ver 0.02 : Schalter und Präsentation hinzufügen