Curves SketchOnSurface/de
Diese Dokumentation ist noch nicht fertiggestellt. Bitte hilf mit und trage etwas zur Dokumentation bei.
Die Seite GuiBefehl Modell erklärt, wie Befehle dokumentiert werden sollten. Unter Category:UnfinishedDocu findest du weitere unvollständige Seiten wie diese (und unter Category:UnfinishedDocu/de unvollständige Übersetzungen). Siehe Category:Command Reference für sämtliche Befehle (und Category:UnfinishedDocu/de für vorhandene Übersetzungen).
Siehe WikiSeiten, um zu lernen, wie die Wiki-Seiten bearbeitet werden und FreeCAD Unterstützen, um andere Wege zu entdecken, wie du einen Beitrag leisten kannst.
|
|
| Menüeintrag |
|---|
| Surfaces → Sketch on Surface |
| Arbeitsbereich |
| Curves |
| Standardtastenkürzel |
| Keiner |
| Eingeführt in Version |
| - |
| Siehe auch |
| Keiner |
Beschreibung
Das Werkzeug Curves SkizzeAufFläche legt eine Skizze über eine beliebig gekrümmte Fläche, wie ein Etikett auf einer Flasche.
Die Skizze muss an einer Fläche befestigt sein (siehe Sketch.Support).
Der
Map-Modus der Skizze hat keinen Einfluss auf das Ergebnis.
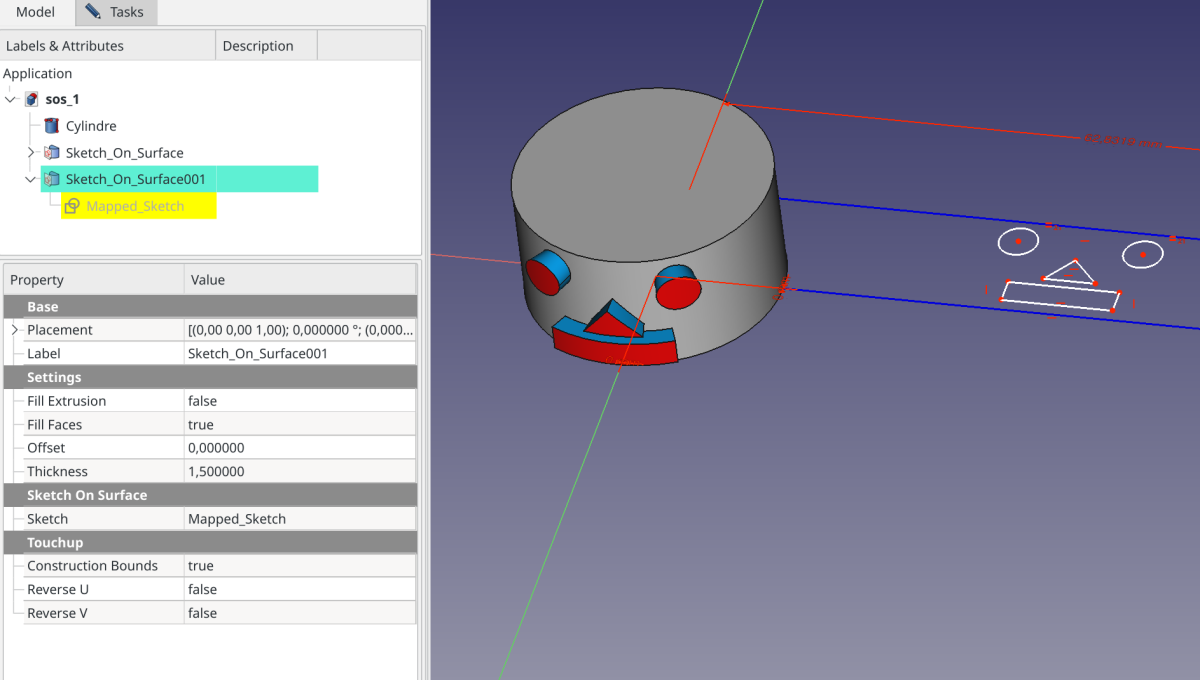
Die Abbildung zeigt ein Sketch_On_Surface-Objekt auf einer Zylinderfläche aufgebracht (links) und die zugrundeliegende Skizze im Bearbeitungsmodus (rechts)
Anwendung
Es gibt zwei Methoden zum Anwenden des Werkzeugs SkizzeAufFläche:
Eine Skizze auf eine ausgewählten Fläche erstellen
- Die Zielfläche in der 3D-Ansicht auswählen.
- Es gibt mehrere Möglichkeiten, das Werkzeug aufzurufen:
- Die Schaltfläche
Skizze auf Oberfläche drücken.
- Die Option Surfaces →
Skizze auf Oberfläche aus dem Menü auswählen.
- Die Schaltfläche
- Ein Sketch_On_Surface-Objekt wird inklusive eines Mapped_Sketch-Objekts erstellt.
- Dieses Objekt in der Baumansicht erweitern, damit die Mapped_Sketch unten angezeigt wird.
- Die Skizze bearbeiten und Geometrien innerhalb der blauen Konstruktionsgrenzen hinzufügen.
- Optional kann man die Werte in der Eigenschaften-Ansicht anpassen, um extrudierte Flächen zu erstellen oder Flächen und äquidistante Flächen aus geschlossenen Skizzenlinien zu füllen, die in Kombination eine Volumenform ergeben, und die zugehörigen Eigenschaften anpassen (siehe Eigenschaften unten).
Eine vorhandene Skizze an einer ausgewählten Fläche befestigen
- Eine vorhandene Skizze an die Zielfläche anhängen:
- Mit der rechten Maustaste auf eine Skizze in der Baumansicht klicken und im Kontextmenü den Eintrag Anhang-Editor auswählen.
- Der Dialog Attachment wird geöffnet.
- Die Zielfläche auswählen.
- Den Attachment-Modus auf Deaktiviert setzen, während man die Fläche als erste Referenz beibehält.
- Auf die Schaltfläche OK drücken, um den Dialog „ Attachment” zu schließen.
- In der Eigenschaften-Ansicht Placement.Position.z = 0 fest setzen.
- Die Skizze bearbeiten und ein Konstruktionsrechteck (blau) um die Geometrien hinzufügen.
- Dieses Rechteck ist die parametrische Begrenzung der Fläche.
- Die Skizze auswählen.
- Das Werkzeug wie oben beschrieben aufrufen.
- Es wird ein Objekt „Sketch_On_Surface” erstellt, das die ausgewählte Skizze enthält.
- Optional kann man die Werte in der Eigenschaften-Ansicht wie oben beschrieben bearbeiten.
Hinweise
- Das Ergebnis ist standardmäßig ein 3D-Kantenzug.
- Um aus der Skizze eine Loft-Fläche zu erstellen, die normal zur Zielfläche verläuft (die blauen Flächen in der obigen Abbildung), wird die Daten-EigenschaftFill Extrusion auf
truegesetzt und für die Daten-EigenschaftThickness ein anderer Wert als0.0eingegeben. - Um die Loft-Form zu schließen, wird die Daten-EigenschaftFill Faces auf
truegesetzt. - Um nur die 3D-Kantenzüge zu füllen, werden die Daten-EigenschaftFill Extrusion auf
falsegesetzt, die Daten-EigenschaftFill Faces auftrueund die Daten-EigenschaftThickness auf0.0gesetzt. Jeder andere Wert für letztere fügt eine zweite, äquidistante Fläche hinzu (die roten Flächen in der obigen Abbildung); Thickness ist in diesem Falle eine Entfernungsangabe). - Zum Verschieben des 3D-Kantenzuges über oder unter die Zielfläche wird ein anderer Wert als
0.0für die Daten-EigenschaftOffset eingegeben; dies verschiebt auch alle darauf basierenden Formen entsprechend. - Sämtliche Geometrie sollte sich innerhalb des blauen Hilfsgeometrierahmens befinden, einschließlich weiterer Hilfsgeometrien und der sichtbaren internen Geometrien komplexer Kurven (Bézier-Kurven, Ellipsen). Ist dies nicht der Fall, ist das umschließende Rechteck (Bounding-Box) der Skizze größer als der Hilfsgeometrierahmen und die übertragene Abbildung wird entsprechend verkleinert. Wenn erforderlich, kann die interne Geometrie ausgeblendet werden, die nicht vollständig im Hilfsgeometrierahmen liegt.
- Enthält eine Skizze mehr Hilfsgeometrie als nur den notwendigen Rahmen, wird jetzt empfohlen, sie nicht direkt zu befestigen, sondern stattdessen ein separates Mapped_Sketch-Objekt mit nur dem Hilfsgeometrierahmen zu erstellen und die gewünschte Skizze in der Daten-EigenschaftExtra Objects zu verlinken. (siehe: Forum)
Eigenschaften
Siehe auch: Eigenschafteneditor.
Ein Sketch_On_Surface-Objekt wird von einem Part-Formelement abgeleitet und erbt alle seine Eigenschaften. Außerdem besitzt es die folgenden zusätzlichen Eigenschaften:
Daten
Settings
- Daten-EigenschaftFill Extrusion (
Bool): Extrusionsflächen hinzufügen - Daten-EigenschaftFill Faces (
Bool): Flächen aus geschlossenen Linienzügen formen - Daten-EigenschaftOffset (
Float): Versatzabstand der zugeordneten Skizze - Daten-EigenschaftThickness (
Float): Extrusionsdicke
SketchOnSurface
- Daten-EigenschaftExtra Objects (
LinkList): Zusätzliche Objekte, die auf die Oberfläche abgebildet werden - Daten-EigenschaftSketch (
Link): Eingabeskizze
Touchup
- Daten-EigenschaftConstruction Bounds (
Bool): Konstruktionsgeometrie in Skizzenbegrenzungen einbeziehen - Daten-EigenschaftReverse U (
Bool): Umgekehrte U-Richtung - Daten-EigenschaftReverse V (
Bool): Umgekehrte V-Richtung - Daten-EigenschaftSwap UV (
Bool): U- und V-Richtung vertauschen
- Curves IsoCurve, Curves JoinCurve, Curves ParametricComb, Curves ParametricSolid, .................
- Erste Schritte
- Installation: Herunterladen, Windows, Linux, Mac, Zusätzliche Komponenten, Docker, AppImage, Ubuntu Snap
- Grundlagen: Über FreeCAD, Graphische Oberfläche, Mausbedienung, Auswahlmethoden, Objektname, Voreinstellungseditor, Arbeitsbereiche, Dokumentstruktur, Objekteigenschaften, FreeCAD unterstützen, Spenden
- Hilfe: Anleitungen, Videoanleitungen
- Arbeitsbereiche: Std Base, Arch, Assembly, BIM, CAM, Draft, FEM, Inspection, Material, Mesh, OpenSCAD, Part, PartDesign, Points, Reverse Engineering, Robot, Sketcher, Spreadsheet, Surface, TechDraw, Test Framework
