Part ColorPerFace
|
|
| Menu location |
|---|
| View → Appearance per Face |
| Workbenches |
| Part, PartDesign |
| Default shortcut |
| None |
| Introduced in version |
| - |
| See also |
| Std Appearance |
Description
The Part ColorPerFace command sets the display properties of selected faces. To change a whole object use Std SetAppearance instead.

The Set appearance per face task panel
Usage
- Select a single object.
- There are several ways to invoke the command:
- If the Part Workbench is active: press the
 Appearance per Face button.
 - Select the View → Appearance per Face option from the menu.
- Select the Appearance per Face option from the Tree View context menu.
- If the Part Workbench is active: press the
- The Appearance per Face task panel opens.
- Select one or more faces:
- Hold down Ctrl to select mutliple faces.
- Optionally press the Box Selection button, click in an empty area and drag a rectangle to select all faces belonging to the object that are (partially) inside the rectangle. Multiple box selections can be specified.
- Do one of the following:
- Select a material from the list.
- Optionally press the Launch Editor button to launch the Material Editor.
- Specify a Custom appearance:
- Press the Appearance button.
- The Material Properties dialog box opens:
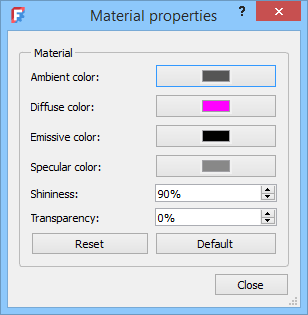
- These properties can be edited:
- Ambient color: color of a surface under indirect, uniform lighting. Determines the color of the shadows on a surface.
- Diffuse color: base color when illuminated by light.
- Emissive color: color of a surface that appears to emit as if it were a light source, independent of external lighting, making the object look self-illuminated. Set to black to have no emissive color.
- Specular color: color and intensity of the bright, mirror-like highlights that appear on shiny or reflective surfaces when light hits them directly. Set to bright colors for shiny objects.
- Shininess: the size and sharpness of specular highlights on a surface. Higher values produce small, sharp highlights, while lower values create broad, soft highlights. Note that the highlight intensity is defined by specular color.
- Transparency: defines how transparent the surface is.
- Optionally press the Reset button to change the appearance to that defined by the material.
- Optionally press the Default button to change the appearance to match the current preferences.
- Press the Close button when done.
- Press the Set to Default button to change the appearance to that defined by the material.
- Select a material from the list.
- Optionally select one or more new faces whose properties you want to change.
- Press the OK button to close the task panel and finish the command.

- File: New Document, Open, Open Recent, Close, Close All, Save, Save As, Save Copy, Save All, Revert, Import, Export,Merge Document, Document Information, Print, Print Preview, Export PDF, Exit
- Edit: Undo, Redo, Cut, Copy, Paste, Duplicate Object, Recompute, Box Selection, Box Element Selection, Select All, Delete, Send to Python Console, Placement, Transform, Align To, Toggle Edit Mode, Properties, Edit Mode, Preferences
- View:
- Miscellaneous: New 3D View, Orthographic View, Perspective View, Fullscreen, Bounding Box, Toggle Axis Cross, Clipping View, Texture Mapping, Toggle Navigation/Edit Mode, Material, Appearance, Random Color, Appearance per Face, Toggle Transparency, Workbench, Status Bar
- Standard Views: Fit All, Fit Selection, Align to Selection, Isometric, Dimetric, Trimetric, Home, Front, Top, Right, Rear, Bottom, Left, Rotate Left, Rotate Right, Store Working View, Recall Working View
- Freeze Display: Save Views, Load Views, Freeze View, Clear Views
- Draw Style: As Is, Points, Wireframe, Hidden Line, No Shading, Shaded, Flat Lines
- Stereo: Stereo Red/Cyan, Stereo Quad Buffer, Stereo Interleaved Rows, Stereo Interleaved Columns, Stereo Off, Issue Camera Position
- Zoom: Zoom In, Zoom Out, Box Zoom
- Document Window: Docked, Undocked, Fullscreen
- Visibility: Toggle Visibility, Show Selection, Hide Selection, Select Visible Objects, Toggle All Objects, Show All Objects, Hide All Objects, Toggle Selectability
- Toolbars: File, Edit, Clipboard, Workbench, Macro, View, Individual Views, Structure, Help, Lock Toolbars
- Panels: Tree View, Property View, Model, Selection View, Python Console, Report View, Tasks, DAG View
- Overlay Docked Panel: Toggle Overlay for All Panels, Toggle Transparent Panels, Toggle Overlay, Toggle Transparent Mode, Bypass Mouse Events in Overlay Panels, Toggle Left, Toggle Right, Toggle Top, Toggle Bottom
- Link Navigation: Go to Linked Object, Go to Deepest Linked Object, Select All Links
- Tree View Actions: Sync View, Sync Selection, Sync Placement, Preselection, Record Selection, Single Document, Multi Document, Collapse/Expand, Initiate Dragging, Go to Selection, Selection Back, Selection Forward
- Tools: Addon Manager, Measure, Clarify Selection, Quick Measure, Units Converter, Load Image, Save Image, Text Document, View Turntable, Scene Inspector, Dependency Graph, Export Dependency Graph, Document Utility, Edit Parameters, Customize
- Macro: Record Macro, Macros, Recent Macros, Execute Macro, Attach to Remote Debugger, Debug Macro, Stop Debugging, Step Over, Step Into, Toggle Breakpoint
- Help: What's This, Start Page, Users Documentation, FreeCAD Forum, Report an Issue, Restart in Safe Mode, Developers Handbook, Python Modules Documentation, FreeCAD Website, Donate to FreeCAD, About FreeCAD
- Additional:
- Miscellaneous: New Part, New Group, Variable Set, Link Group, Select All Instances, Toggle Freeze
- Datums: Coordinate System, Datum Plane, Datum Line, Datum Point
- Link Actions: Make Link, Make Sub-Link, Replace With Link, Unlink, Import Link, Import All Links
- Expression Actions: Copy Selected, Copy Active Document, Copy All Documents, Paste
- Selection Filter: Vertex Selection, Edge Selection, Face Selection, No Selection Filters
- Getting started
- Installation: Download, Windows, Linux, Mac, Additional components, Docker, AppImage, Ubuntu Snap
- Basics: About FreeCAD, Interface, Mouse navigation, Selection methods, Object name, Preferences, Workbenches, Document structure, Properties, Help FreeCAD, Donate
- Help: Tutorials, Video tutorials
- Workbenches: Std Base, Assembly, BIM, CAM, Draft, FEM, Inspection, Material, Mesh, OpenSCAD, Part, PartDesign, Points, Reverse Engineering, Robot, Sketcher, Spreadsheet, Surface, TechDraw, Test Framework
- Hubs: User hub, Power users hub, Developer hub