Arch Window/ro
|
|
| poziția meniului |
|---|
| Arch → Window |
| Ateliere |
| Arch |
| scurtătură |
| W I |
| Prezentat în versiune |
| - |
| A se vedea, de asemenea, |
| Arch Wall |
Descriere
Fereastra este un obiect de bază pentru toate tipurile de obiecte "încorporate", cum ar fi ferestrele și ușile. Este concepută să fie independentă, sau "găzduită" în interiorul unei alte componente, cum ar fi Arch Wall, Arch Structure sau Arch Roof. Are o geometrie proprie, care poate fi făcută din mai multe componente solide (de obicei un cadru și panouri interioare) și definește de asemenea un volum care trebuie scăzut din obiectele gazdă, pentru a crea o deschidere.
Elementele ferestrei se bazează pe obiecte 2D închise, cum ar fi Draft Rectangles ori Sketches, care sunt folosite pentru a defini componentele lor interioare. Obiectul de bază 2D trebuie să conțină, prin urmare, mai multe filamente închise, care pot fi combinate pentru a forma panouri umplute (un filament) sau rame (mai multe filamente).
Instrumentul Window are câteva funcții presets, acest lucru permite utilizatorului să creeze tipuri comune de ferestre și uși cu anumiți parametri editabili, fără a fi nevoie ca utilizatorul să creeze manual obiecte și componente de bază 2D.
Toate informațiile aplicabile unui Arch Window se aplică și pentru Arch Door, deoarece este același obiect de bază. Principala diferență dintre un Ferest și o Ușă este că Ușa are un panou interior care este arătat opac (ușa însăși), în timp ce Fereastra are un panou parțial transparent (geamul).

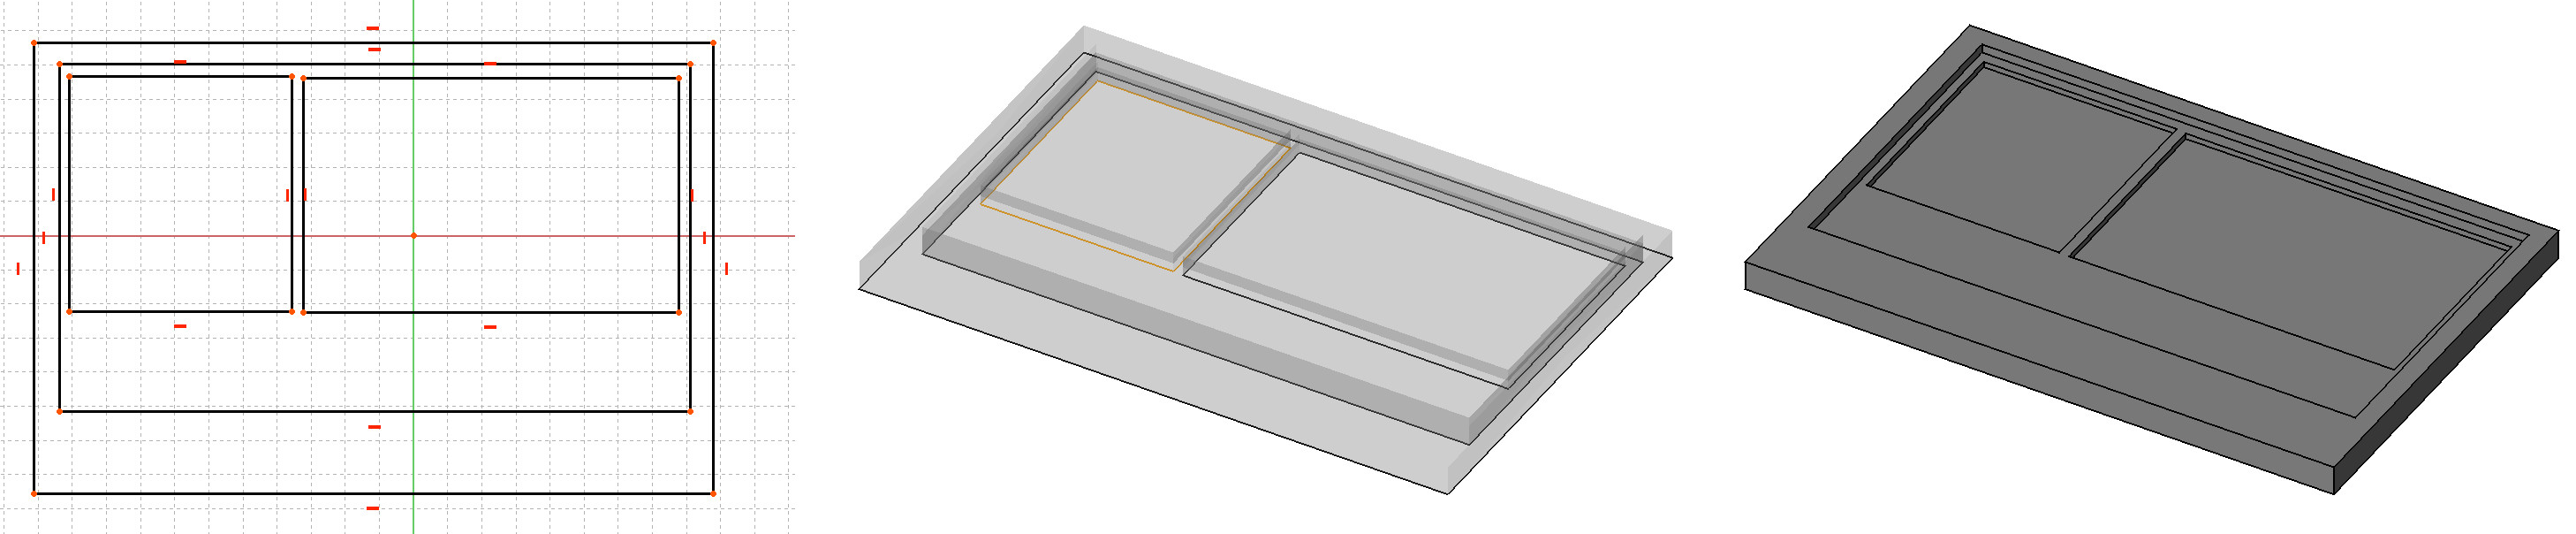
Complex window being constructed on top of a Sketch. When entering the window's edit mode you can create different components, set their thickness, and select and assign wires from the sketch to them.
Cum se folosește
There are different ways to create windows, depending on the desired level of detail and functionality.
Utilizarea predefinitelor
This is the most straightforward way of creation, where existing presets cover the most general types of windows.
- Opțional, selectați un obiect Arch. Dacă nu este selectat niciun obiect, fereastra va fi inserată în obiectul de sub mouse când plasați fereastra.
- Press the
 Arch Window button, or press W then I keys
 - Select one of the presets in the list
- Fill out the desired parameters
- Press the OK button
Learn more about presets.
Crearea de la zero
When the desired window format is not covered by any of the existing presets, custom windows can be created and optionally included as user presets in addition to the built-in presets.
- Opțional, selectați o fațetă de pe Arch unde doriți să fie inclusă fereastra
- Switch to the Sketcher Workbench
- Create a new sketch
- Draw one or more closed wires
- Close the sketch
- Switch back to the Arch Workbench
- Press the Arch Window button, or press W then I keys
- Enter Edit mode by double-clicking the window in the tree view, to adjust the window components
Learn more about custom components.
Creating a window from custom types
- Create a window frame object, a glass panel, and any other window component you need, using Part or PartDesign tools.
- For example, create a base rectangular sketch for your window, then a profile sketch for the frame, and create a Part Sweep to sweep the profile around the base sketch. Create a Part Offset2D from the base sketch, then a Part Extrude to create the glass panel.
- Optionally, create a volume to be subtracted from the wall, for example by extruding the base sketch. Make sure its visibility is turned off.
- Make sure all these pieces have a unique, meaningful name (for example, "Frame" or "Glass panel").
- Create a container object, a Std Part or (introduced in 26.3) an App LinkGroup, and place all your subcomponents in it. To avoid out of scope errors the App LinkGroup container type should be used if there is a subtraction volume.
- If you want to make your window parametric, you can add 3 properties to your container object, by right-clicking its Property View and selecting Add Property. Add the following properties (all are optional, the property group doesn't matter):
- Height as a PropertyLength and link it, for example, to a vertical constraint of your base sketch.
- Width as a PropertyLength and link it, for example, to a horizontal constraint of your base sketch.
- Subvolume as a PropertyLink and link it to the volume to be subtracted that we created above.
- Tag as a PropertyString.
- To create window objects from the newly-created type. select the container object and press the
 Window button, or any of the alternative ways to invoke the tool.
The DateHeight, DateWidth, DateSubvolume and DateTag properties of the window will be linked to the corresponding properties of the container object, if existing.
Learn more about custom types.
Strategies for placing windows
TBD - explain:
- Links vs clones - Advanced snapping
Opţiuni
- Ferestrele partajează proprietățile și comportamentele comune ale tuturorArch Components
- If the Auto-includecheckbox on the Window creation task panel is unchecked, the window won't be inserted into any host object on creation.
- Add a selected window to a wall by selecting both, then pressing the
 Arch Add button.
 - Remove a selected window from a wall by selecting the window, then pressing the
 Arch Remove button.
 - When using presets, it is often convenient to turn the "Near" Draft Snap on, so you can snap your window to an existing face.
- The hole created by a window in its host object is determined by two properties: Hole Depth and Hole Wire (introduced in 0.17). The Hole Wire number can be picked in the 3D view from the window's task panel available when double-clicking the window in the tree view
- Windows poate folosi Multi-Materials. Fereastra va căuta în Multi-Material -ul atașat pentru straturi de materiale cu același nume pentru fiecare componentă a ferestrei și o folosește dacă este găsită. De exemplu, o componentă numită "OuterFrame" va căuta în Multi-Material atașat, pentru un strat de material numit "OuterFrame". Dacă se găsește un astfel de strat, materialul său va fi atribuit componentei OuterFrame. Valoarea grosimii stratului de material nu este luată în considerare.
Deschideri
A se vedea de asemenea: Tutorial for open windows
Ușile și ferestrele pot apărea parțial sau complet în modelul 3D sau pot fi afișate atât în plan cât și în elevație. Consequently, these will also appear in extracted 2D views generated by Draft Shape2DView or TechDraw Workbench or Drawing Workbench.Pentru a obține acest lucru, cel puțin una dintre componentele ferestrei trebuie să aibă o articulație și un mod de deschidere definit (vezi #Building components de mai sus). Apoi, folosind proprietățile Open, Symbol Plan sau Elevation Symbol , puteți configura aspectul ferestrei:
introduced in 26.3: The Sliding door preset uses the DateOpening value to slide the door leaf between closed and open positions, and its Tree View context menu provides an Invert Sliding Direction command.

Setări prealabile
Sunt disponibile următoarele presetări:
-
 Glass door
 -
 Simple door
 -
 Double-opening window
 -
 Fixed window
 -
 Single-opening window
 -
 Sash-opening window


Additional user presets
In addition to the default presets, the window tool can also use custom presets. A custom preset is a FreeCAD file containing a single window based on a parametric sketch that has two named constrains: Width and Height. Custom presets can be placed in the following locations:
$ROOT_DIR/Arch/Doors/Custom/
$ROOT_DIR/Arch/Windows/Custom/
If you install the Parts Library from the Addon Manager, the window tool will also search this library for additional presets at this pair of locations:
$ROOT_DIR/Mod/parts_library/Architectural Parts/Doors/Custom/
$ROOT_DIR/Mod/parts_library/Architectural Parts/Windows/Custom/
- The $ROOT_DIR is the user directory where FreeCAD configuration files, macros, and external workbenches are stored. It can be found be entering
FreeCAD.getUserAppDataDir()in the Python Console.- On Linux it is usually /home/username/.local/share/FreeCAD/
- On Windows it is usually C:\Users\username\Application Data\FreeCAD\
- On Mac OSX it is usually /Users/username/Library/Preferences/FreeCAD/
- The subdirectory name Custom is just a suggestion, any name can be used. But the files must be placed in one or more subdirectories inside the Doors or Windows directories.
Custom presets will be available in the window tool's presets dropdown menu. Presets in library locations will also be available in the Parts Library dialog.
Construcția de componente
You can access, create, modify and delete components of a window in edit mode (double-click the window in the Tree View).
Windows can include 4 types of components: frames, solid panels, glass panels and louvres. Panels and louvres are made from one closed wire, which gets extruded, while frames are made from 2 or more closed wire, where each one is extruded, then the smaller ones are subtracted from the biggest one.
The components have the following properties:
- Name: Un nume al componentului
- Type: The type of component. Can be "Frame", "Glass panel", "Solid panel" or "Louvres"
- Wires: A comma-separated list of wires the component is based on
- Thickness: The extrusion thickness of the component
- Z Offset: The distance between the component and its base 2D wire(s)
- Hinge: This allows you to select an edge from the base 2D object, then set that edge as a hinge for this component and the next ones in the list
- Opening mode: If you defined a hinge in this component or any other earlier in the list, setting the opening mode will allow the window to appear open or to display 2D opening symbols in plan or elevation.

Custom types
Windows can also take advantage of other tools, specifically PartDesign workflows, to define a type. A type is an object that defines the shape of the window.

Download the example file shown above
Note that windows created in this manner do not support the Openings features.
Materials
To build a material for type-based windows:
- Create a multi-material.
- Create one entry in the multi-material for each component of your Std Part or (introduced in 26.3) App LinkGroup. For example, one "Frame", one "Glass panel" as we used above. Make sure to use the exact same name.
- Attribute that multi-material to each of the windows derived from the same type.
You can use a different workflow than the one described above, the important points to remember are:
- The type object must be one object and it must have a DateGroup property or (introduced in 26.3) an DateElementList property. For type-based windows with a subtraction volume an App LinkGroup should be used as already explained.
- The type object must have a DateSubvolume property for openings in host objects to work.
- The type object must have components with the same names as the multi-material items for multi-materials to work.
Proprietăți
An Arch Window object shares the common properties and behaviors of all Arch Components.
Data
Window
- DateHeight: Înălțimea acestei ferestre
- DateWidth: The width of this window
- DateHole Depth: The depth of the hole created by this window in its host object
- DateHole Wire: The number of the wire from the base object that is used to create a hole in the host object of this window. This value can be set graphically when double-clicking the window in the tree view. Setting a value of 0 will make the window automatically pick its biggest wire for the hole.
- DateWindow Parts: A list of strings (5 strings per component, setting the component options above)
- DateLouvre Width: If any of the components is set to "Louvres", this property defines the size of the louvre elements
- DateLouvre Spacing: If any of the components is set to "Louvres", this property defines the spacing between the louvre elements
- DateOpening: All components that have their opening mode set, and provided a hinge is defined in them or in an earlier component in the list, will appear open by a percentage defined by this value
- DateSymbol Plan: Shows 2D opening symbol in plan
- DateSymbol Elevation: Shows 2D opening symbol in elevation
Scripting
Script
Instrumentul pentru ferestre poate fi utilizat în macro-uri și din consola Python utilizând următoarea funcție:
Window = makeWindow(baseobj=None, width=None, height=None, parts=None, name="Window")
- Toate argumentele sunt opționale
- Creează un
Window </ code> bazat pebaseobj </ code>, care ar trebui să fie un Draft Wire sau Sketcher Sketch. - Dacă este disponibil, setează
width </ code>,height </ code> șiname </ code> - Dacă
baseobj </ code> nu este o formă închisă, este posibil ca instrumentul să nu creeze o figură solidă adecvată
Exempluː
import FreeCAD as App
import Draft
import Arch

rect = Draft.makeRectangle(length=900, height=3000)
# Optional: rotate it to be on the XZ plane, so that the window is upright
rect.Placement.Rotation = App.Rotation(App.Vector(1, 0, 0), 90)
App.ActiveDocument.recompute()
Window = Arch.makeWindow(rect)
App.ActiveDocument.recompute()
You can also create a Window from a preset.
Window = makeWindowPreset(windowtype, width, height, h1, h2, h3, w1, w2, o1, o2, placement=None)
Example:
import FreeCAD as App
import Arch

base = App.Vector(2000, 0, 0)
axis = App.Vector(1, 0, 0)
place= App.Placement(base, App.Rotation(axis, 90))

door = Arch.makeWindowPreset("Simple door",
                             width=900, height=2000,
                             h1=100, h2=100, h3=100, w1=200, w2=100, o1=0, o2=100,
                             placement=place)
 BIM
BIM
- 2D Drafting: Sketch, Line, Polyline, Rectangle, Arc, Arc From 3 Points, Circle, Ellipse, Polygon, B-Spline, Bézier Curve, Cubic Bézier Curve, Point, Fillet
- 3D/BIM: Site, Building, Level, Space, Wall, Curtain Wall, Column, Beam, Slab, Door, Window, Covering, Pipe, Connector, Stairs, Roof, Panel, Frame, Fence, Truss, Equipment
- Reinforcement Tools: Custom Rebar, Straight Rebar, U-Shape Rebar, L-Shape Rebar, Stirrup, Bent-Shape Rebar, Helical Rebar, Column Reinforcement, Beam Reinforcement, Slab Reinforcement, Footing Reinforcement
- Generic 3D Tools: Profile, Box, Shape Builder, Facebinder, Objects Library, Component, External Reference
- Annotation: Aligned Dimension, Horizontal Dimension, Vertical Dimension, Text, Leader, Label, Hatch, Axis, Axis System, Grid, Section Plane, 2D Drawing, Section View, Section Cut, New Page, New View
- Snapping: Snap Lock, Snap Endpoint, Snap Midpoint, Snap Center, Snap Angle, Snap Intersection, Snap Perpendicular, Snap Extension, Snap Parallel, Snap Special, Snap Near, Snap Ortho, Snap Grid, Snap Working Plane, Snap Dimensions, Toggle Grid, Working Plane Front, Working Plane Top, Working Plane Side, Working Plane
- Modify: Move, Rotate, Scale, Mirror, Clone, Make Link, Copy, Simple Copy, Compound, 2D Offset, Offset, Trimex, Join, Split, Stretch, Draft to Sketch, Upgrade, Downgrade, Add Component, Remove Component, Array, Path Array, Polar Array, Point Array, Cut With Plane, Extrude, Union, Difference, Intersection
- Manage: BIM Setup, Setup Project, Manage Doors and Windows, Manage IFC Elements, Manage IFC Quantities, Manage IFC Properties, Manage Classification, Manage Layers, Material, BIM Report, Schedule, Preflight Checks, Annotation Styles
- Utils: Move to Trash, Working Plane View, Select Group, Set Slope, Working Plane Proxy, Add to Construction Group, Split Mesh, Mesh to Shape, Select Non-Manifold Meshes, Remove Shape From BIM, Close Holes, Merge Walls, Check, Toggle IFC B-Rep Flag, Toggle Subcomponents, Survey, IFC Diff, IFC Explorer, New IFC Spreadsheet, Image Plane, Unclone, Rewire, Glue, Re-Extrude
- Panel Tools: Panel, Panel Cut, Panel Sheet, Nest
- Structure Tools: Structure, Structural System, Multiple Structures
- IFC Tools: IFC Project, IFC Diff, IFC Expand, Convert to IFC Project, IfcOpenShell Update
- Nudge: Nudge Switch, Nudge Up, Nudge Down, Nudge Left, Nudge Right, Nudge Rotate Left, Nudge Rotate Right, Nudge Extend, Nudge Shrink
- Additional: Preferences, Fine tuning, Import Export Preferences, IFC, DAE, OBJ, JSON, 3DS, SHP
 User documentation
- Getting started
- Installation: Download, Windows, Linux, Mac, Additional components, Docker, AppImage, Ubuntu Snap
- Basics: About FreeCAD, Interface, Mouse navigation, Selection methods, Object name, Preferences, Workbenches, Document structure, Properties, Help FreeCAD, Donate
- Help: Tutorials, Video tutorials
- Workbenches: Std Base, Assembly, BIM, CAM, Draft, FEM, Inspection, Material, Mesh, OpenSCAD, Part, PartDesign, Points, Reverse Engineering, Robot, Sketcher, Spreadsheet, Surface, TechDraw, Test Framework
- Hubs: User hub, Power users hub, Developer hub