Thread for Screw Tutorial/ja
| Topic |
|---|
| 製品デザイン |
| Level |
| 上級 |
| Time to complete |
| 60分 |
| Authors |
| DeepSOIC, Murdic, vocx |
| FreeCAD version |
| 0.19 |
| Example files |
| Updated: Thread for screw tutorial |
| See also |
| None |
概要
FreeCADでネジ山をモデルするいくつかの技法についてのチュートリアルです。技法の基本的な部分はチュートリアルが最初に書かれたv0.14以来変わっていませんが、v0.19向けに更新されています。本チュートリアルでは、 パートデザイン・ワークベンチを使ってネジ山を作る技法について述べますが、このチュートリアルが作成された後で導入された
パートデザイン・加算らせんツールは使っていません。
従来のCADシステムでは、モデリングカーネルや形状のレンダリングに大きな負荷がかかるため、ネジ山をモデリングすることは推奨されていませんでした。製造現場に渡す2D図面上でネジの特性を記述すればいいので、従来のシステムでは3Dデーター上でネジ山を直接表現する必要はありませんでした。しかし、積層造形(3Dプリント)技術の普及に伴い、3D設計の通りにプリントする必要上、ネジ山の3D形状をモデル化する必要がでてきました。このチュートリアルは、そのためのものです。
Many of the techniques presented here have been collected from different forum threads:
See also helpful videos:
Remember that thread shapes take a lot of memory, and having just one thread in a document can increase the file size significantly, so the user is advised to create threads only when absolutely necessary.
Method 1. Using utilities and parts from workbenches
Using utilities and parts that other people have created is easy and saves time. See the external workbenches page for information on external tools.
In particular, three resources are recommended that can be installed from the Addon Manager:
- Fasteners Workbench, to add/attach various fasteners to parts. The screws and nuts don't show a thread by default, but this can be controlled with an option.
- BOLTSFC Workbench, to place fasteners from the BOLTS library.
- ThreadProfile Workbench, to create common threads.
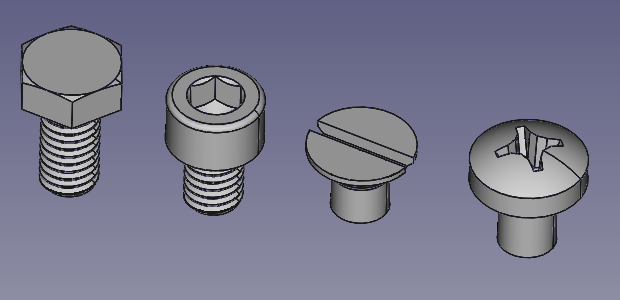
Various standard screws inserted with the Fasteners Workbench. An option controls whether an object shows the real thread or just a plain cylinder.
Method 2. Using macros (deprecated)
- In the past, the Macro BOLTS was used to insert the parts from the BOLTS library. This is now deprecated. Use the BOLTSFC Workbench instead.
- In the past the stand-alone Screw Maker macro, by ulrich1a, was used to create individual bolts, screws, and washers. This is now deprecated. The Fasteners workbench, by shaise, includes the complete screw maker macro, together with a GUI to select the right component.
Method 3. Fake threads: non-helical
In many cases we don't need real threads, we just need a visual indication that the threads will be there.
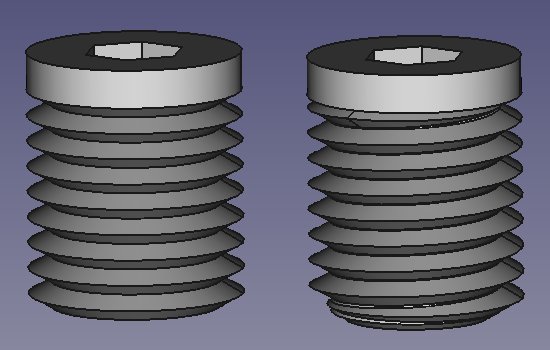
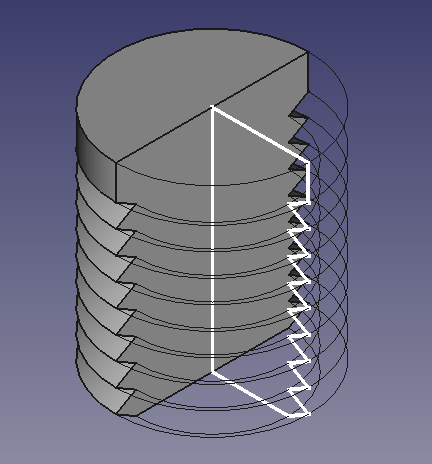
We can create a fake thread by using a non-helical path, for example by revolving a sawtooth profile, or by stacking discs with tapered edges. This fake thread is hard to tell apart from the real helical one by simple inspection. This method is good for visualizing a thread-like object, but it is not useful if we need to 3D-print an actual thread.
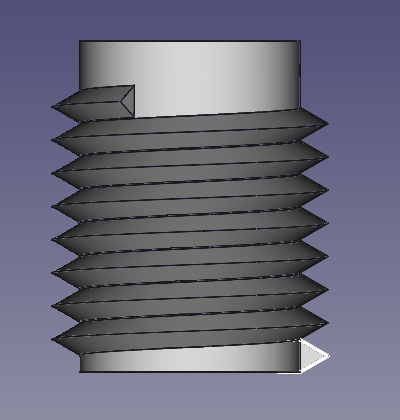
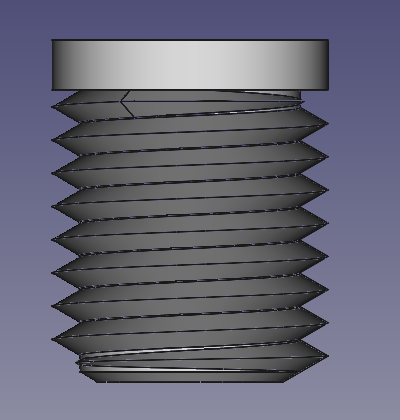
Left: simple bolt with a fake, non-helical thread. Right: simple bolt with a real helical thread. When 3D printing is not needed, a simulated thread is often sufficient for visualization.
Revolving sawtooth profile
- Click on
PartDesign Body.
- Click on
PartDesign New sketch. Select
XZ_Plane. - Draw a closed sketch with the required inner diameter
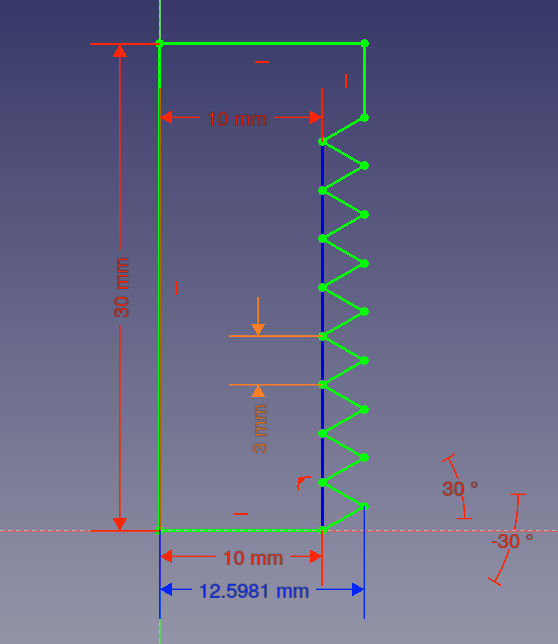
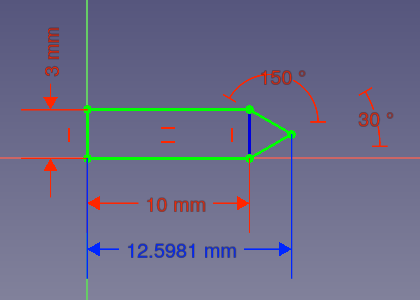
10 mm, outer diameter around12.6 mm, pitch3 mm, number of teeth8, and total height30 mm. - Select the sketch, then click on
PartDesign Revolution. Select
Vertical sketch axis, and press OK.
Profile used to create the revolution that will simulate a thread.
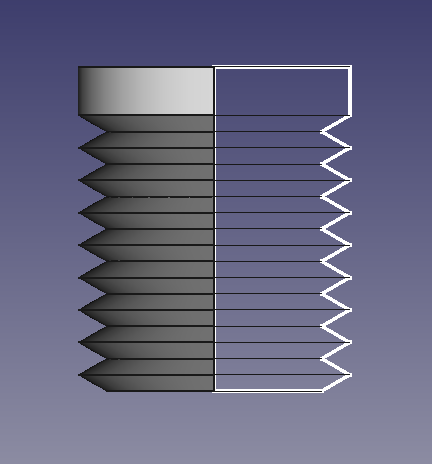
Sectional view of the resulting non-helical thread produced by revolving the sawtooth profile around the vertical axis.
Stacking discs
- Repeat the first two steps from the previous section.
- Draw a closed sketch with the required inner diameter
10 mm, outer diameter around12.6 mm, and pitch3 mm, but draw only a single tooth of the sawtooth. - Select the sketch, then click on
PartDesign Revolution. Select
Vertical sketch axis, and press OK. - Select the
Revolution, then click onPartDesign Linear pattern. Select
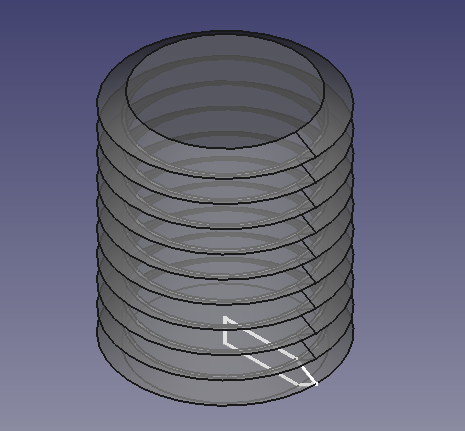
Vertical sketch axis. For a fake thread with a pitch of3 mm, set the Length to3, and Occurrences to2, then press OK. This will create two discs, one on top of the other. - You can add more discs by increasing the value of Occurrences in the linear pattern, and by raising the Length, which is the total length of the fake thread.
The Length and Occurrences are related. If the length is too large, but the number of occurrences is not high enough, you will have disconnected discs, and the Body computation will fail, as the resulting object must always be a single contiguous solid. For example, to get a total height of 30 mm, set Length to 27 mm and Occurrences to 10.
If you wish, you may add a PartDesign Additive cylinder with a diameter equal to the inner diameter of the discs, and as high as the total thread height. This will join all discs into a single solid, thus guaranteeing that there will not be disconnected discs.
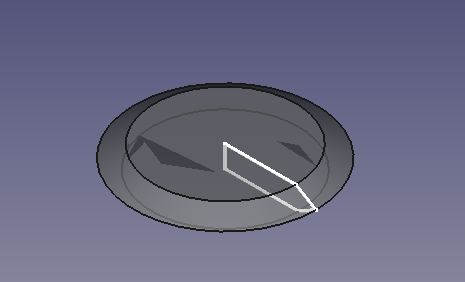
Profile used to create a revolved disc that will be used to simulate a thread.
Left: single disc created by revolution. Right: multiple discs placed in a linear pattern in the Z direction simulating a helical thread.
Method 4. Sweeping a vertical profile
PartDesign Workbench
A true thread consists of a closed profile sweeping a solid along a helical path.
- In the
Part Workbench, click on
Part Primitives to create a
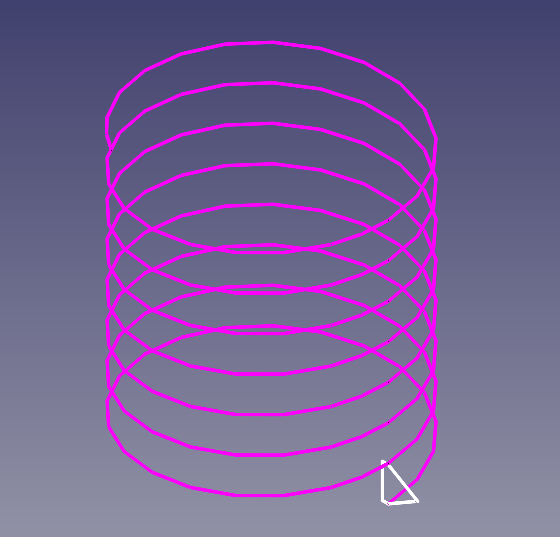
Part Helix. Give it the appropriate values for Pitch
3 mm, Height23 mm, and Radius10 mm. - Move to the
PartDesign Workbench, and click on
PartDesign Body.
- Click on
PartDesign New sketch. Select
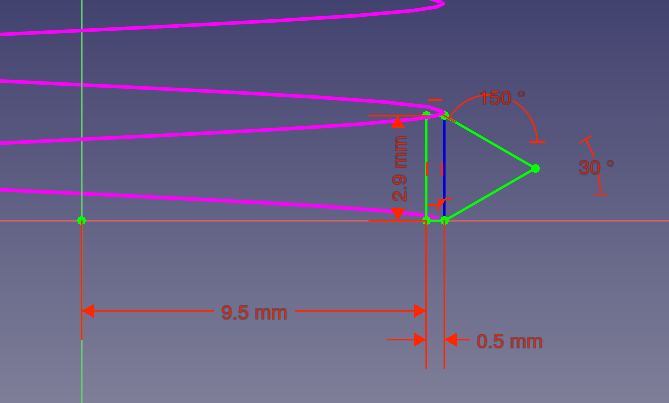
XZ_Plane. - Draw a closed sketch with the required profile for the thread teeth, normally a triangular shape. In this case we will use a height of
2.9 mm, which is slightly smaller than the3.0 mmpitch used for the helix path. The profile must not create any self intersections when moved along the helix, neither between the turns nor in the middle, thus the sketch as shown for stacking disks cannot be used. - Select the sketch, then click on
PartDesign Additive pipe. In Path to sweep along, click on Object, and choose the helix object previously created. Then change Orientation mode to
Frenetso that the profile sweeps the path without twisting; then press OK. - When the dialog asks for a reference, choose
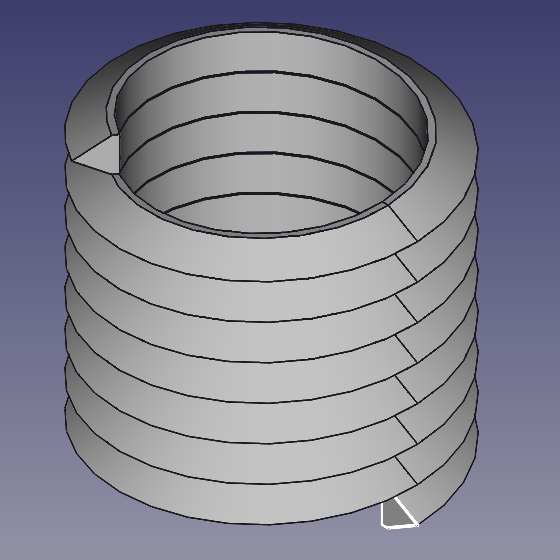
Create cross-reference. - The helical coil is created, but there is no central body or shaft.
- Click on
PartDesign Additive cylinder with the appropriate Radius
10 mmand Height29.9 mmto touch the rest of the helical thread and automatically fuse to it. - Additional boolean operations are needed to shape up the abrupt ends of the coil. For example, you can use additive features to provide a head to the screw, and a tip.
Left: profile for a helical thread. Right: helical path that will be used to create a sweep.
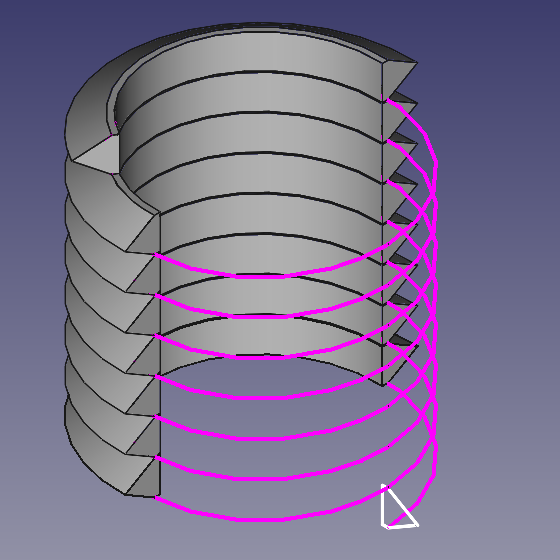
Left: helical coil resulting from the sweep operation of the closed profile along the helical path. Right: sectional view of the coil produced from the sweep.
Left: helical coil fused to a central cylinder to form the body of the screw. Right: more features, a head and a tip, added to improve the shape of the screw.
Part Workbench
This process can also be done with the tools of the Part Workbench.
- In the
Part Workbench, click on
Part Primitives to create a
Part Helix. Give it the appropriate values for Pitch
3 mm, Height23 mm, and Radius10 mm. - In this case, you don't need a
PartDesign Body. Switch to the
Sketcher Workbench, then click
Sketcher New sketch, and choose the global XZ plane.
- Then return to the
Part Workbench, and use
Part sweep.
- Select the appropriate sketch from Available profile and click the arrow to pass it to Selected profiles.
- Click Sweep path, and choose all edges of the existing helix in the 3D view. Click Done.
- Make sure to tick
Create solid and
Frenet. Obtaining a solid is the key to be able to perform Part Boolean operations with the resulting coil, otherwise only a surface will be produced.
- Click OK to exit the dialog and create the coil.
Now you can proceed to add other primitives like Part Cylinders, or other shapes, in order to perform
Part Fuses and
Part Cuts to finish building the screw.
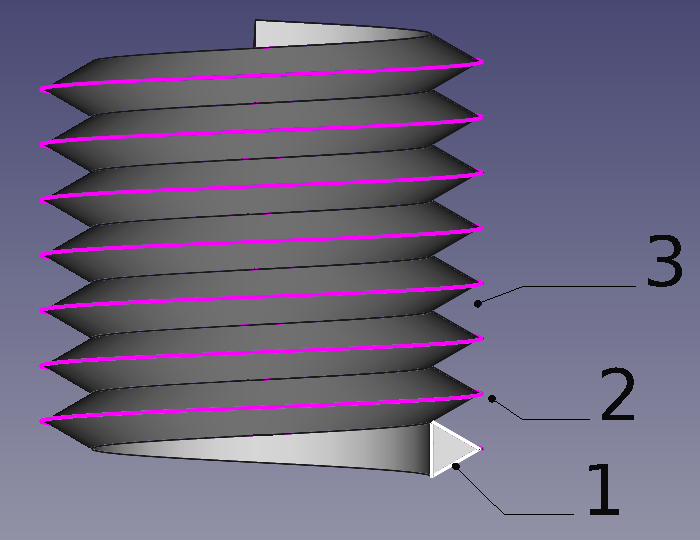
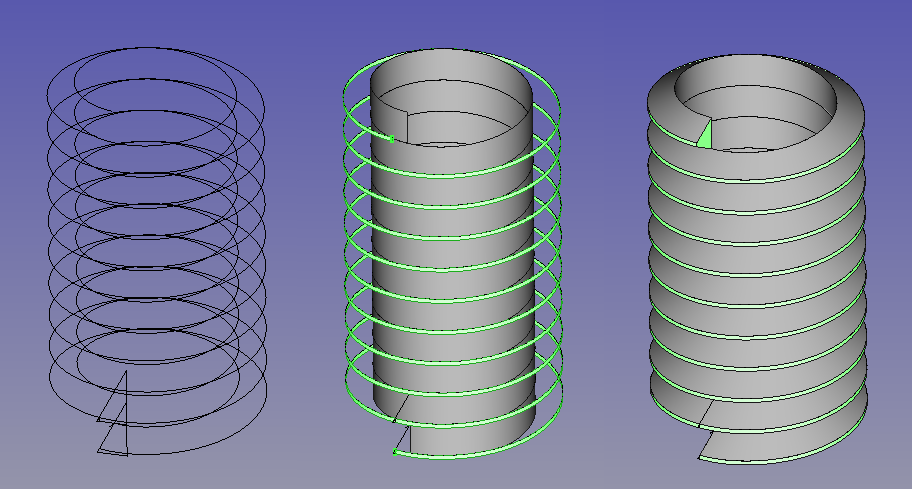
Creating a thread coil by sweeping a vertical profile, (1) the sketch profile, (2) the helical sweeping path, and (3) the result of the sweep.
Tips for success
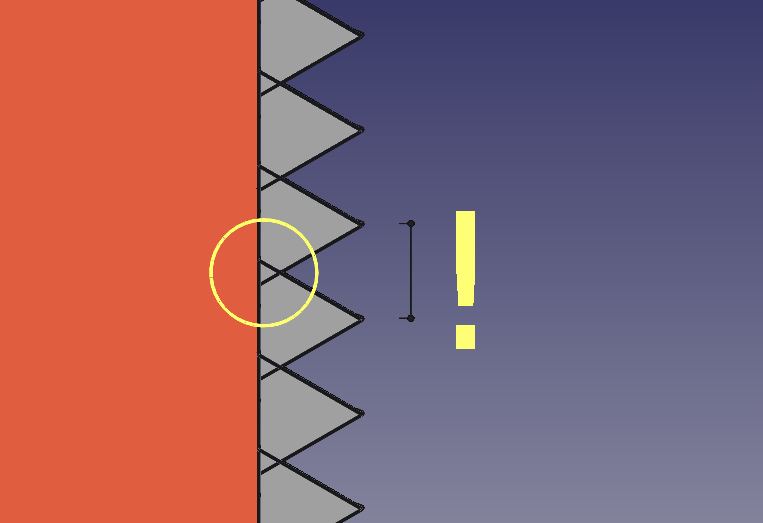
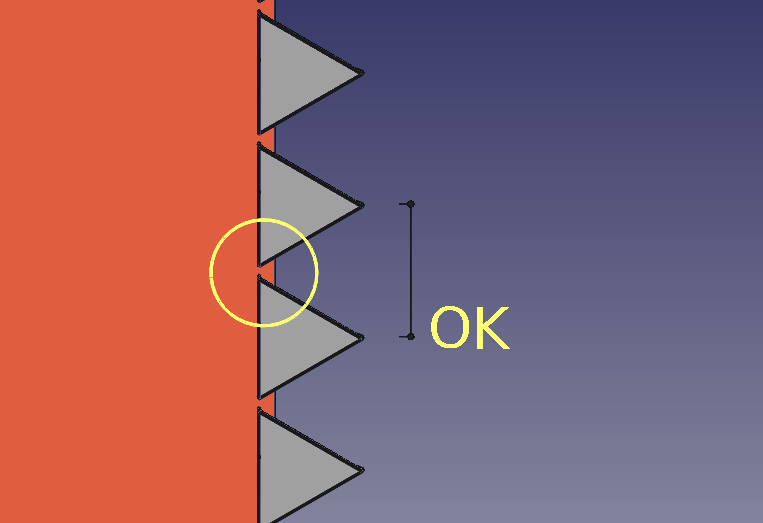
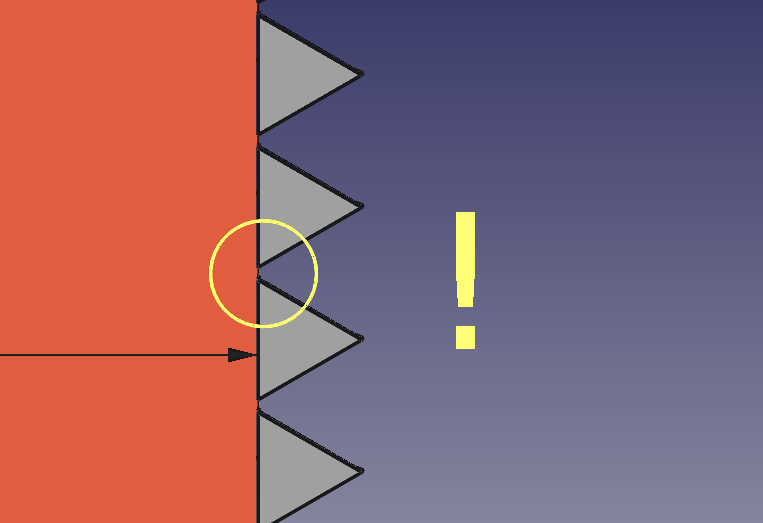
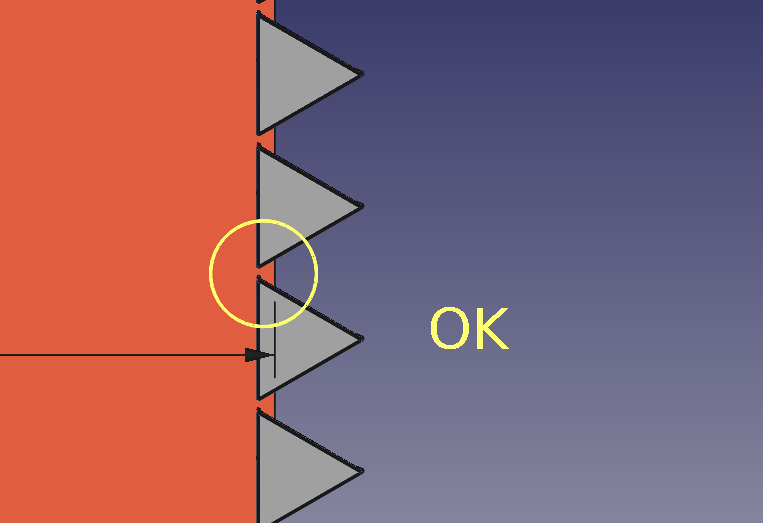
- Rule 1. When the profile sweeps the helix, the resulting solid coil must not touch or self-intersect as it will be an invalid solid. This holds for the profile moving along the helix, as well as intersections in the center of the helix. Attempts to do boolean operations with it (fuse or cut) are very likely to fail. Check the quality of the coil with
Part CheckGeometry; if self-intersections are reported, you must increase the pitch of the helix.
Left: invalid sweep generated by using a very small pitch of the helix compared to the height of the triangular profile. Right: pitch that is sufficiently large and doesn't cause self-intersections.
- Rule 2. When a cylinder is added to a coil to form the main shaft of a screw, the cylinder must not be tangent to the coil profile. That is, the cylinder must not have the same radius as the inner radius of the thread, as this is very likely to fail a fuse operation. In general, avoid geometry coincident to elements of the sweep, such as tangent faces, or edges tangent to faces they are not connected to. In order to produce a good boolean union, the swept coil and the cylinder must intersect. Check the quality of the fusion with
Part CheckGeometry; if coplanar faces are reported increase the cylinder's radius by a small amount.
- If the coil and the cylinder are tangent, even if the first fusion succeeds, it may fail in subsequent boolean operations with a third solid.
- This is a limitation of the OpenCASCADE Technology (OCCT) kernel; in general, it doesn't handle well operations between coplanar surfaces.
Left: the solid cylinder is tangent to the inner radius of the thread; this may result in an invalid boolean union. Right: the cylinder has a slightly larger radius, so the two solids intersect; this will result in a valid fusion.
- Rule 3. The inner cylinder has a seamline. You should avoid placing the start of the helix along that seam. Either turn the helix or the cylinder by some degrees.
- Tip 1. The radius of the helical path does not matter, unless the helix is tapered. All that matters is the pitch and the height of the helix. This means that you can use a single
Part Helix to generate several threads with equal pitch. What determines the position of the resulting coil is the position of the profile sketch.
- Tip 2. Keep the thread short, that is, with a low number of turns. Long threads tend to fail with boolean operations. If you need to add many turns, consider creating first a short thread, and then using
Draft OrthoArray to duplicate the same pattern several times.
- Tip 3. For 3D visualization and 3D printing it may be okay to leave the cylinder and the thread unfused, that is, with intersections between the two solids. Reducing the amount the boolean operations results in less memory consumption and smaller files.
Pros and cons
Easy to understand.
Very natural way of defining a thread profile.
No problems with meshing of the resulting object, unlike method 5.
Due to invalidity of self-intersecting sweeps, it is next to impossible to generate a thread with no gap between each tooth, that is, with no straight cylindrical face at the inner sides of the thread.
Boolean operations are required to obtain a single contiguous solid. Boolean operations take a relatively long time to calculate, and fail often.
Threads with a high number of turns are problematic.
Method 5. Sweeping a horizontal profile
General
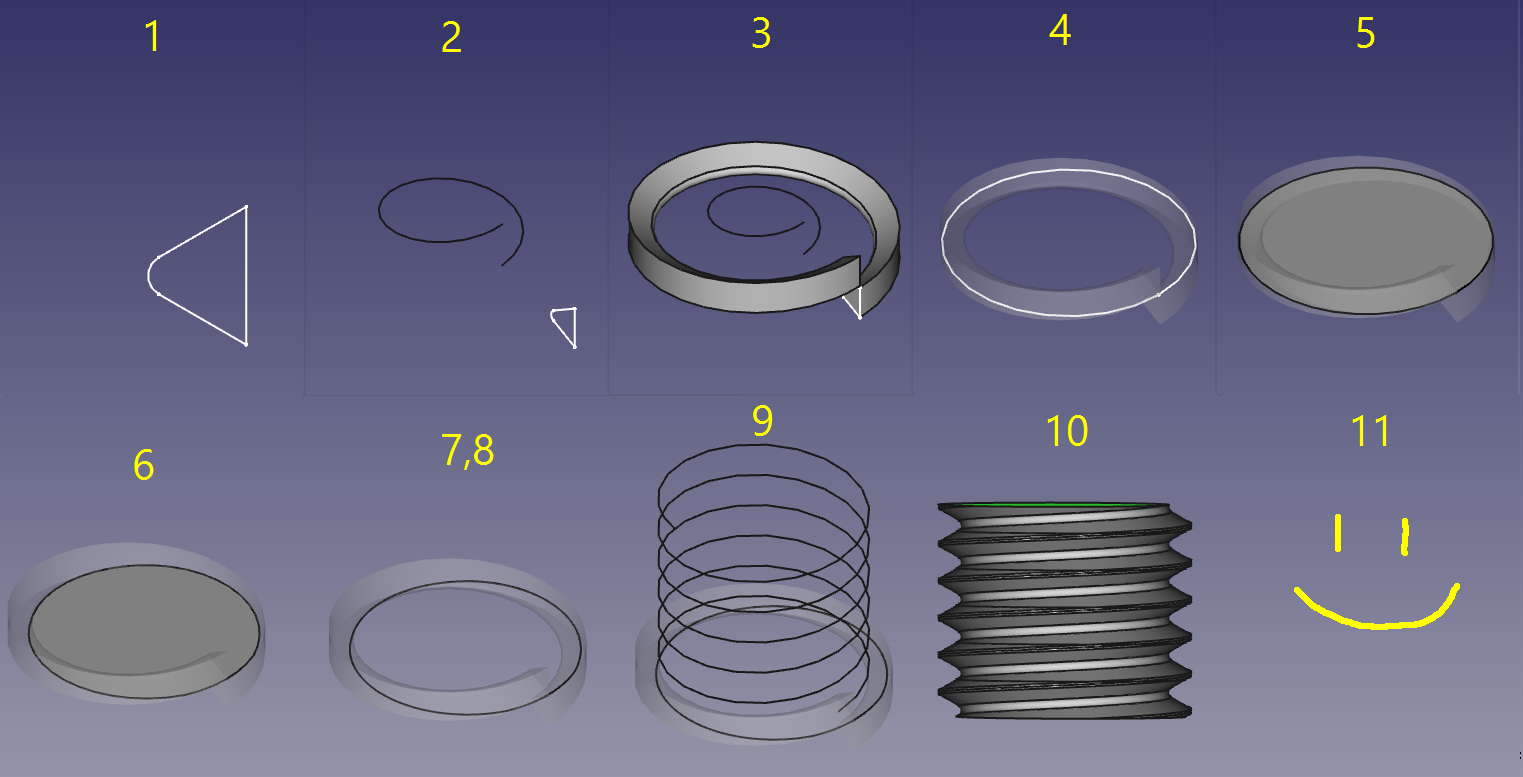
The idea is to sweep a horizontal cross-section of the thread along a helix. The main problem here is figuring out the profile to use to obtain such thread.
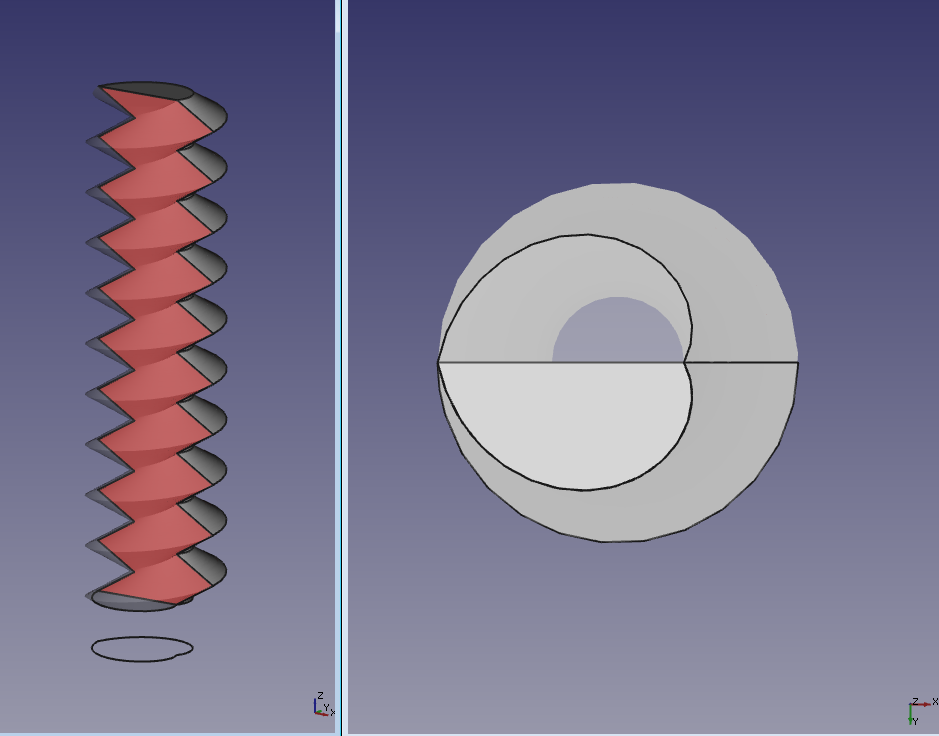
If one uses a circle as a horizontal profile (the circle has to be placed off the origin, that offset defines the depth of the thread), the thread profile will be sinusoidal.
To obtain a standard sawtooth profile, a pair of mirrored archimedean spirals need to be fused into a wire. The resulting figure is a heart shape, which becomes barely distinguishable from a circle when the depth of the thread is small compared to its diameter, this is why a "thick" thread is shown on the picture above.
Generating the profile
Figuring out the horizontal profile to obtain a certain vertical profile is not easy. For simple cases like triangular or trapezoidal it can be constructed manually. Alternatively, it can be constructed by creating a short thread with method 4, and getting a slice of it by doing a Part Common between a horizontal plane face and the thread.
Profile for triangular thread
- First create an Archimedian spiral in the XY plane.
- Set the number of turns to 0.5.
- Set the radius to the inner radius of the thread, the outer radius will be this plus the depth of the cut.
- Set the growth to double the depth of cut of the thread.
- Part Mirror the spiral against the XY plane
- Part Fuse the spiral and the mirror to obtain a closed wire, shaped like a heart.
Profile for arbitrary cross-section
- Make a vertical cut profile. Make sure that the height of the sketch matches the pitch of the thread you need.
- Make a helix1 with height identical to the pitch and the pitch identical to the thread pitch, and a helix radius of 0.42*nominal diameter of the thread.
- Sweep the cut profile along the helix1. Set
Create solid and
Frenet.
- Make a circle with nominal radius of the thread in the XY plane.
- Make a face from the circle. This can be done with
Part Builder or
Draft Upgrade, then set データMakeFace to
true. - Cut the face with the sweep profile.
- Make a
Draft Clone from the cut.
- Use
Draft Downgrade on the clone in order to get a wire. This wire is the horizontal profile needed for this method.
- Make a helix with radius of nominal radius of the thread and a pitch of the thread and the height of the needed thread.
- Sweep the wire along the helix. Set
Create solid and
Frenet.
- You are done.
The step-by-step guide was taken from this forum post by Ulrich1a ("Creating a thread: Unexpected results"), slightly modified.
The steps are also shown in action on this video by Gaurav Prabhudesai ("FreeCAD : How to make threads").
Pros and cons
a ready-to-use thread-on-a-rod solid shape is created by the sweep directly.
fewer or even no boolean operations are required, so generation speed is very high compared to Method 4.
thread ends are nicely cut straight away
long threads are not a problem, unless a boolean operation is needed. Otherwise, it is not going to be much better than Method 4.
threads without a gap are not a problem.
defining thread profile is complicated.
using the standard mesher with a thread created in this way generates ugly meshes, which can lead to problems. Other meshers are better, for example, Mefisto seems to give the best results.
large memory footprint according to Gathering thread modeling techniques.
Method 6. Lofting between helical extruded faces
General
Helical splines will extrude coaxial faces that are able to be lofted, while FreeCAD's parametric helix won't. It takes two helical splines to define a thread. Those two can be scaled from a library spline, then located and extruded appropriately to get the form right.
FreeCAD's parametric helixes aren't truly helical, but helical b-splines aren't difficult to lay out. One manual method is to array dodecagons (12-sided polygons) with 5mm radius/10mm diameter at 1/12mm (0.08333.mm) z intervals and trace splines from vertex to vertex in ascending and rotating order, and to consider doing it once with, say, 10 turns, so that that spline can be re-used as a library file for import and reuse. It's convenient to use 10mm diameter/1mm pitch for ease of scaling. If you are doing it manually, drawing a Dwire and then converting it to a b-spline is easier than drawing a spline. Dwires don't have curvature computed while being drawn, so they follow the cursor and snap more obediently.
Once the splines are scaled to the right size and located so that the loft will have the right included angle between the thread flanks, they're extruded along their axis, a pitch length's worth for the inner spline, the outer pitch/8.
ISO and other threads have relieved, ie flat, inner and outer edges rather than sharp, which suits FreeCAD users with this method, because we can loft to the helical face at the nominal fastener size, while an inner face can't be lofted to an outer edge spline because a face is a closed profile, a spline is open. ISO standard says the nominal size of external threads have a face width pitch/8. The picture shows how the geometry is arranged, and the helical faces that result. Then, loft between the faces, and then a cylinder that gives the inner helical face, which ISO puts at pitch/4 width, is added to the threads.
This method produces reliable solids that boolean properly. While it doesn't produce "parametric" screw threads in standard sizes in the sense of having simple access to form by fastener size, it's an easy way of producing an accurate library for reuse, and models of specialised forms like ACME, or Archimedian screws, are also uncomplicated as one-offs.
- Creation and modification: New Sketch, Extrude, Revolve, Mirror, Scale, Fillet, Chamfer, Face From Wires, Ruled Surface, Loft, Sweep, Section, Cross-Sections, 3D Offset, 2D Offset, Thickness, Project on Surface, Appearance per Face
- Boolean: Compound, Explode Compound, Compound Filter, Boolean Operation, Cut, Union, Intersection, Connect Shapes, Embed Shapes, Cutout Shape, Boolean Fragments, Slice Apart, Slice to Compound, Boolean XOR, Check Geometry, Defeaturing
- Other tools: Box Selection, Shape From Mesh, Points From Shape, Convert to Solid, Reverse Shapes, Simple Copy, Transformed Copy, Shape Element Copy, Refine Shape, Set Tolerance, Persistent Section Cut, Attachment
- Preferences: Preferences, Fine tuning
- Helper tools: New Body, New Sketch, Attach Sketch, Edit Sketch, Validate Sketch, Check Geometry, Sub-Shape Binder, Clone
- Modeling tools:
- Additive tools: Pad, Revolution, Additive Loft, Additive Pipe, Additive Helix, Additive Box, Additive Cylinder, Additive Sphere, Additive Cone, Additive Ellipsoid, Additive Torus, Additive Prism, Additive Wedge
- Subtractive tools: Pocket, Hole, Groove, Subtractive Loft, Subtractive Pipe, Subtractive Helix, Subtractive Box, Subtractive Cylinder, Subtractive Sphere, Subtractive Cone, Subtractive Ellipsoid, Subtractive Torus, Subtractive Prism, Subtractive Wedge
- Boolean: Boolean Operation
- Dress-up tools: Fillet, Chamfer, Draft, Thickness
- Transformation tools: Mirror, Linear Pattern, Polar Pattern, Multi-Transform, Scale
- Additional tools: Shape Binder, Involute Gear, Sprocket, Shaft Design Wizard
- Context menu: Suppressed, Set Tip, Move Object To…, Move Feature After…
- Preferences: Preferences, Fine tuning
- 全般: スケッチを作成、スケッチを編集、スケッチをアタッチ、スケッチの方向を変更、スケッチを検証、スケッチをマージ、スケッチを鏡像化、スケッチの編集を終了、スケッチを表示、セクション表示、グリッドの表示を切り替え、スナップの切り替え、レンダリング順を設定、操作を停止
- スケッチャージオメトリー: 点を作成、ポリライン(折れ線)を作成、線分を作成、中心点から円弧を作成、3点指定円弧を作成、楕円弧を作成、双曲線の円弧を作成、放物線の円弧を作成、中心を指定して円を作成、3点で円を作成、中心点を指定して楕円を作成、3点を指定して楕円を作成、長方形を作成、中心配置長方形、角丸長方形、正三角形, 正方形、正五角形、正六角形、正七角形、正八角形、正多角形、長円形を作成、円弧状の長円形を作成、制御点によるBスプライン, 制御点によるBスプライン、制御点によるBスプライン、ノットによる周期的Bスプライン、構築ジオメトリの切り替え
- スケッチャー拘束:
- 寸法拘束: 寸法、水平距離拘束、垂直距離拘束、距離拘束、半径/直径を自動拘束、半径拘束、直径拘束、角度を拘束、ロック拘束
- 幾何拘束: 一致拘束(統合)、一致拘束、点がオブジェクト上にある拘束、水平/垂直拘束、水平拘束、垂直拘束、 並行拘束, 直角拘束、正接拘束または共線拘束、等値拘束、対称拘束、固定拘束
- その他の拘束: 屈折率拘束(スネルの法則)
- 拘束ツール: 駆動拘束/参照拘束の切り替え、駆動拘束/参照拘束の切り替え
- スケッチャーツール フレットを作成、面取りを作成、エッジをトリム、エッジを分割、エッジを延長、外部ジオメトリを作成、カーボンコピーを作成、原点を選択, 水平軸を選択、垂直軸を選択、配列変換, 軸周変換、スケール変換、オフセット、対称、軸方向の拘束を解除、すべてのジオメトリーを削除, すべての拘束を削除
- スケッチャーBスプラインツール: ジオメトリをB-スプラインに変換、Bスプラインの次数を増やす、Bスプラインの次数を減らす、ノット多重度を増やす, ノット多重度を減らす、ノットを挿入、曲線を結合
- スケッチャー表示ツール: 未拘束の自由度を選択、関連する拘束を選択、関連する要素を選択、冗長な拘束を選択、競合する拘束を選択、円弧の補助円を表示/非表示、Bスプライン次数の表示/非表示, Bスプライン制御ポリゴンの表示/非表示、Bスプライン曲率コームの表示/非表示、Bスプラインノット多重度の表示/非表示、Bスプライン制御点重みの表示/非表示、内部ジオメトリの表示/非表示、仮想スペース切り替え
- はじめてみよう
- インストール: ダウンロード、Windowsへのインストール、Linuxへのインストール、Macへのインストール、付加機能のインストール、Dockerでのコンパイル、AppImage、Ubuntu Snap
- 基本: FreeCADについて、ユーザー・インタフェース、Mマウス・ナビゲーション、オブジェクトの選択方法、オブジェクトの名前、設定、ワークベンチ、FreeCADファイルの構造、プロパティ、FreeCADへの貢献、寄付
- ヘルプ: チュートリアル、チュートリアル動画
- ワークベンチ: 共通ツール、アセンブリー、BIM、CAM、ドラフト、FEM、インスペクション、マテリアル、メッシュ、OpenSCAD、 パート、パートデザイン、ポイント、リバースエンジニアリング、ロボット、スケッチャー、スプレッドシート、サーフェス、テックドロー、テストフレームワーク
- 情報ハブ: ユーザー向けハブ、パワーユーザー向けハブ、開発者向けハブ
